How to Grow Orchids From Cuttings With Pictures
 When you bring home your first Phalaenopsis orchid, and start to learn how to care for it properly, it quickly becomes a passion. Soon having just one orchid has turned into having multiple orchids! There's just something about these plants, that is almost addictive – people get bitten by the Phalaenopsis orchid bug! (Rest assure, it's not dangerous)
As we care for our indoor orchids, every part of it becomes interesting; the watering, repotting, watching new leaves grow, watching new roots grow, watching a flower spike arise and develop into beautiful flowers!
But as it is with all things in life, we keep pushing the envelope. Once we master one step, we want to take another step – it's human nature, that's how we become better at things!
There will be a point in every orchid keeper's journey when they visit the thought of how to propagate these plants at home. And that's why you're here too! So let's explore this topic below in more detail.
So can orchids grow from cuttings? Unlike many other house plants, like Christmas Cactus and Spider Plant, Phalaenopsis orchids cannot be grown from cuttings. They have a different way to propagate.
I get it – it's always a disappointing answer to deliver to the person asking about it. With some other plants, like some of my other favorite plants Christmas and Thanksgiving cacti, it's so easy to multiply them – just take a cutting from the mother plant, root it, and plant it in potting medium. If only Phalaenopsis orchids were this easy! But sadly, it's just not their biology, how they propagate.
How do you propagate orchids?
Phalaenopsis orchids can be propagated only from seeds. So first and foremost that's what you need; seeds.
Seeds are collected from a pollinated flower. In nature bees and other insects would do the pollination part for us, but in home conditions, we can only rely on ourselves. (Channel your inner bee!) 🐝
To do this you, of course, need a Phalaenopsis orchid that is in bloom. Decide which flower you want to pollinate – this flower will grow into a seedpod if the pollination is successful! You can take pollen from any flower – from the same orchid or a different one.
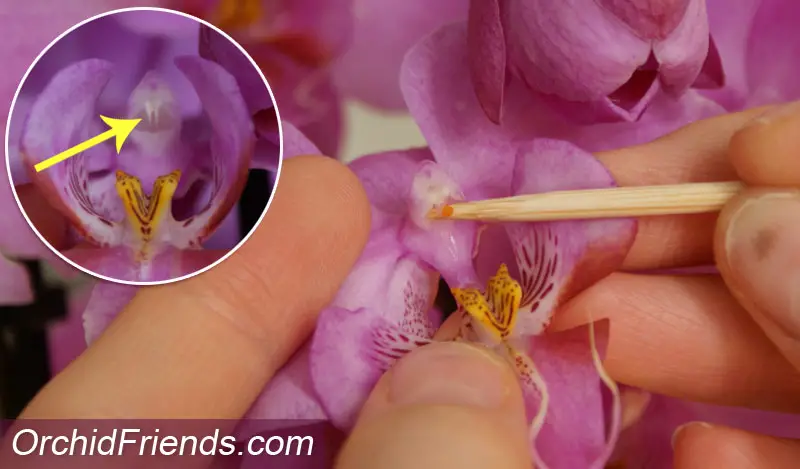
Pollen is located in the flower, in the part called "Column". (Please, see the photo below) The Column looks like a bird's face with two eyes and a beak. You need to gently "pop" the Column open, it's almost like cap, so just flip it open with your finger. This will expose the two little pollens you need for the pollination.
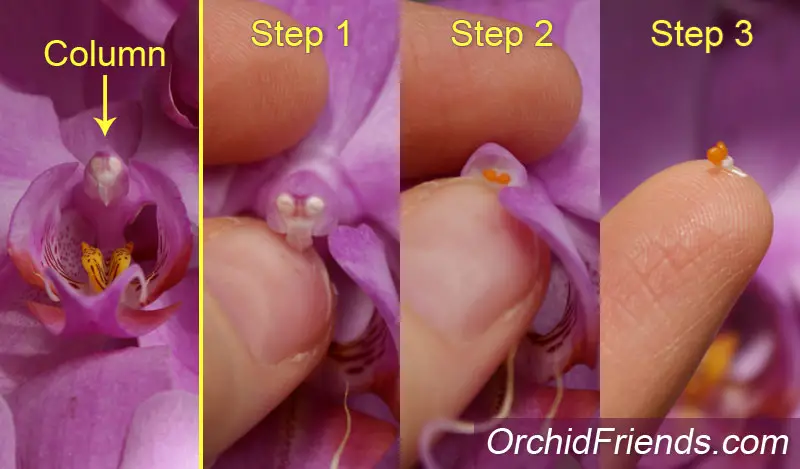
Only one pollen is needed to pollinate one flower, so with either a Q-tip or toothpick etc, take one pollen. They're quite sticky, so be aware! What you need to do next is to simply put this pollen inside the Collumn part. Push it all the way inside there, where you can't even see it anymore.
In the picture below, you see where the yellow arrow is pointing to – it looks almost like a shark's mouth! You need to put it up there, towards where the shark's nose is.
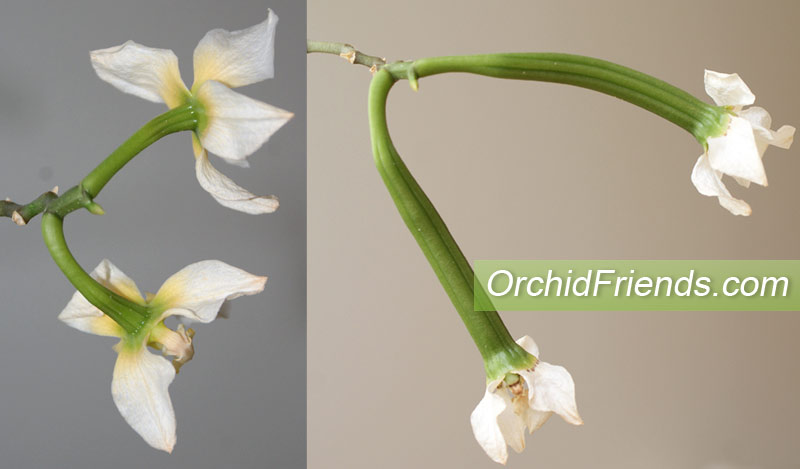
That's it. Next you can only wait and see if the pollination was successful. If you see the flower starting to wither, and then change its form, you know the pollination succeeded! In the next few weeks you will start to see some changes, and the flower will turn into a seedpod over a few months!
Seedpods contain hundreds of thousands, if not millions, of orchid seeds. In nature, once the seedpod has matured and broken open, the wind carries these tiny seeds all around the jungle. About 1% of these seeds will germinate and grow into plants.
The low germination rate is because Phalaenopsis orchids require a symbiotic relationship with fungus to help germinate their seeds. That's why only about 1% of the seeds will ever become anything in the wilderness.
In home conditions, it's close to impossible to mimic these conditions to germinate seeds. You would need a completely sterile surrounding to do it. And every kind of orchid needs a different species of fungus to germinate, so it really is a "Mad Scientist" project to propagate orchid seeds at home!
Laboratories can do this, though, and there are a few places where you can even send your own seedpod for germination. They will germinate some seeds for you and then send them to you by mail. Of course these services cost money, but they're not that expensive.
The success rate for laboratory germination is 100% – which is a big contrast to the 1% in nature! But this is also why Phalaenopsis orchids are so affordable these days; they can be mass-produced.
Still not that many years ago orchids were way more expensive and rare. You didn't see them in people's houses, or even in most garden shops! They were the plants of, I'd like to say "rich and famous", but I guess "niche" is a more suitable choice of word here. They truly weren't plants you'd bring your mother-in-law whenever visiting her!
I do not recommend propagation at home, simply because it's so difficult and acquires a lab-like setting. I have been close to trying it myself, but then gave up just before! Simply because of the complexity of it.
Also, you must remember one thing; how many of the same orchid do you want? All the seeds will yield orchids with the same kind of flowers. So if you got 50-100 of the same seeds successfully germinated, would you really want so many of the same orchid? Unless, of course, you're planning to sell them or give them away.
You can, of course, mix pollen from different colored Phalaenopsis orchids, which will give you a surprise outcome. For example; if you took pollen from a yellow flower and pollinated it with a white flower with dark spots – it will come out as a mix of those two!
But keep in mind; it will take about 4 years to get to the flowering stage from the propagation stage. It's a long time to wait! Though surely worth it in the end, if you do decide to take this route – whether it's with the help of a laboratory or by yourself at home.
Lastly. To see seedpods develop is beyond fascinating, but it takes a lot of energy for the orchid to grow one! So if you're not planning to do anything with the seeds, then think twice if you really want to pollinate or not. It's just a lot to handle for the orchid – even though fascinating for us to see unfold.
How to multiply orchids?
Okay, so the main way to multiply Phalaenopsis orchids is the way I explained you above – by germinating the seeds. But there is also another way these orchids can be multiplied with, which can even be done in home surroundings. This method is the plants growing a "keiki".
What is an orchid "keiki"?
Keiki is the identical clone of the 'mother' plant. It can grow from a flower spike or at the base of the orchid (aka "Basal keiki"). Keikis grow their own leaves and roots. People often refer to them as "babies", and indeed the Hawaiian word 'keiki' means exactly that.
But in reality, it's not a real orchid baby. A real orchid baby is grown from a seed. And a 'keiki' is simply just a clone of the orchid that's growing it – it IS that same orchid.
Often times struggling orchids can grow keikis – it's their way to survive, to keep living. So if the 'mother' plant thinks it might be dying, it can quickly start to grow a keiki; if the 'mother' plant then dies, it can still keep living 'through' the keiki as a separate plant.
However, totally healthy orchids make keikis too. In nature, keikis help secure the orchid on the growing surface by holding on to it with their roots. Think of it like this; an orchid growing a keiki is like us humans growing a brand new hand with fingers. With these new 'hands' the orchid grows higher and lower on the growing surface, making it stronger and more secure during wind and storms. The roots also deliver nutrients to the plant.
As the keiki is an identical clone of the mother plant, the flowers will be exactly the same. So if you don't want several orchids with the same flowers, then you might not be interested in having keikis. Though of course, you could always give it to a friend as a gift!
Keikis can be left attached to the 'mother' plant, or separated. Separation can be done when the keiki has grown at least 3 roots that are at least 3 inches long. If it's growing from a flower spike, then just cut it off and plant it in a pot with moss and bark in it. Keep the medium moist enough, so the roots can start to grow in it.
If you have a basal keiki, then you can separate it by first unpotting the mother plant – remove all potting medium. Then gently separate the keiki from the mother plant, and repot as normal. Or, you can let it be – they can grow together too.
How to get a keiki on my orchid?
Naturally grown, keikis are a total surprise. Even with struggling or dying orchids, it's not guaranteed they'll grow a keiki. And on the contrary, there are also Phalaenopsis orchids that make keikis relatively often! So do not make your orchid struggle, just to manipulate it to make a keiki – because it's not guaranteed!
One way to try to get a keiki is with flower spikes – cut them off from the base once they're done blooming. Every section of the spike where nodes are present can yield a possible keiki. So if you cut the whole spike from the base, and put it to stand in water, some keikis might start to grow from them. (Also cut out the section where the flowers grew from) This can take months though, so be prepared, and even then it's not guaranteed.
Another option, an unnatural one, is to manipulate the node to grow a keiki with growth hormones. Yes, you heard it right: Growth hormones! This comes in form of "keiki paste" – a thick paste that contains different growth hormones. Some pastes include Thiamine HCl, Cinnamic Acid & 6BAP. And others in addition to those three compounds, also IAA and KINETIN.
The paste is applied to one of the lower nodes on the flower spike. This paste creates a biological response in the orchid, by starting to grow a keiki! (Sometimes instead of a keiki, you might get a secondary branch)

Keiki paste can be ordered online, there are some private people who make and sell it. If you do end up testing it, remember to avoid contact with skin when handling the paste. (It's growth hormone!)
Just apply some paste on a node, and wait. When I did this on one of my orchids, I saw new growth already in 12 days! It's better not to apply keiki paste on many nodes on the same spike "just to be certain", because if the paste does work the spike can start to grow keikis from all of those nodes! Which is exhausting for the mother plant.
So apply the paste preferably only on 1 (max 2) node per spike. The best time to do it is after the spike has finished blooming – not during. Some people also say if you apply the paste on the second and third node from the base of the spike, you're more likely to get a keiki. And if you apply the paste on the upper nodes, then you're more likely to get a secondary spike.
Once again, be patient to see results – it usually takes months for the keiki paste to work and for the keikis to grow!
How long does it take for a Keiki to grow?
Keikis grow much faster than real "orchid babies". As I mentioned earlier, it takes 4 years for a seed to grow into an adult orchid that makes flowers. But for a keiki the growing speed is much faster. In the first year alone the plant can grow pretty big, and even make flowers! I've even seen tiny keikis make flowers.
FINAL THOUGHTS
I hope this article has answered some of your questions regarding orchid cuttings! I'm sorry to be the one delivering you the bad news. But, what can we do – we can't beat nature! Even though there are some tricks and tips we can always try out, like the keiki paste I told you about above. It's a very unnatural thing to do, but I get it, sometimes we simply want different results, than what mother Earth has decided for us!
And I guess that's also something that makes keeping orchids interesting – us learning new things and developing our skills with these plants. The more we experience the wiser we get – nothing beats experience! So try it for yourself, ultimately it's up to you what you want to do with your Phalaenopsis orchids.
And it's good to know there really ARE options, and especially if you want to preserve one of your favorite orchids! Cuttings are out of the question, but you can still try the other avenues; keiki paste and propagation.
With that, I thank you for reading. If you have any questions or comments regarding this topic, please leave them in the comment section below! I'd also like to hear about your experiences with keikis, propagation, and keiki paste!
Thanks again and until next time, orchid friends! 😊
Perhaps you want to learn more:
How to Grow Orchids From Cuttings With Pictures
Source: https://orchidfriends.com/can-orchids-grow-from-cuttings/
0 Response to "How to Grow Orchids From Cuttings With Pictures"
Post a Comment